
Using duplicity and Backblaze B2 storage for backup
Making regular backups of your data is important. I hope no one is trying to debate on that. Of course, some data is more important than other, but given that you want to keep things around, I recommend you to store your data in a good place and then make sure backups are done completely automatic.
I do this using an Ansible role, my Nextcloud, duplicity and since a few days a backup cloud provider called Backblaze. The backups themselves are done already for quite a while, but I used Hetzner storage boxes for that until switching.
Backup strategy
Generally speaking everyone should be aware of the 3-2-1-Backup strategy. And while there is some room for customization, it’s never wrong to apply it. The idea is that you have 3 copies of your data, 2 of them on-site on two different mediums and a third one off-site either at a friend, family or cloud provider.
To achieve this I keep, for example, my documents on my local devices. But also use the desktop client to synchronize it to my Nextcloud instance. That’s two copies of the files on different mediums. The actual off-site is the one I’ll talk about in this article that uses duplicity to create a backup of Nextcloud.
It’s important to take into consideration, that given your Nextcloud instance is classified as “on-site”, you should use another provider for your off-site backup. And that’s the reason why I’m switching away from Hetzner storage boxes. They are great and work perfectly fine, but since I move more and more services to Hetzner cloud instances, I don’t want to store my backup there.
Two different cloud providers are important, because mistakes happen. From an (accidental) deletion of all my account’s products at a cloud provider, over large scale hardware failures, to not working payment methods. In all cases, if your off-site backup is using anything in common as your “on-site” backup, you’ll are in trouble. So spreading the risk is important here.
But enough of the strategy and theory, let’s get started.
Account creation and setting up the bucket
In order to do server backups with duplicity, Backblaze offers their so-called “B2” storage. It’s basically like Amazon’s S3 storage, just with less proxying and instead one more API request to store data.
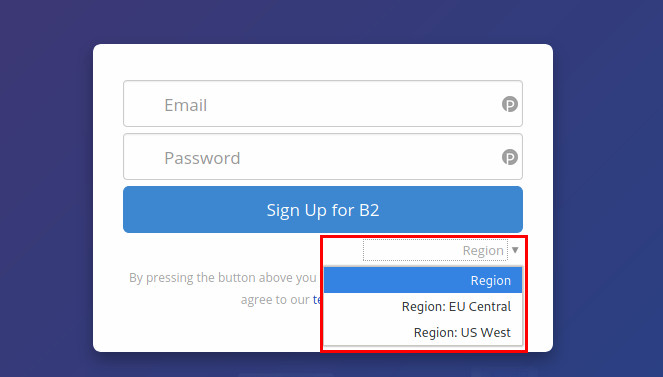
During account creation you select the region where your data backups are stored in. Since I prefer to have my data in the EU, I had explicitly selected the region in the sign-up form. Make sure you do your choice there. It’s easy to miss and I couldn’t find any setting to change it after account creation.
Otherwise, it’s like everywhere. Throw in an email address and a password. Get your 2FA setup, confirm your email address, add billing information and create a private “bucket” to throw in your backup data into it.
Then switch the “App Keys”-dialogue where you can create the access tokens for your buckets, which will be used by duplicity to back up your data.
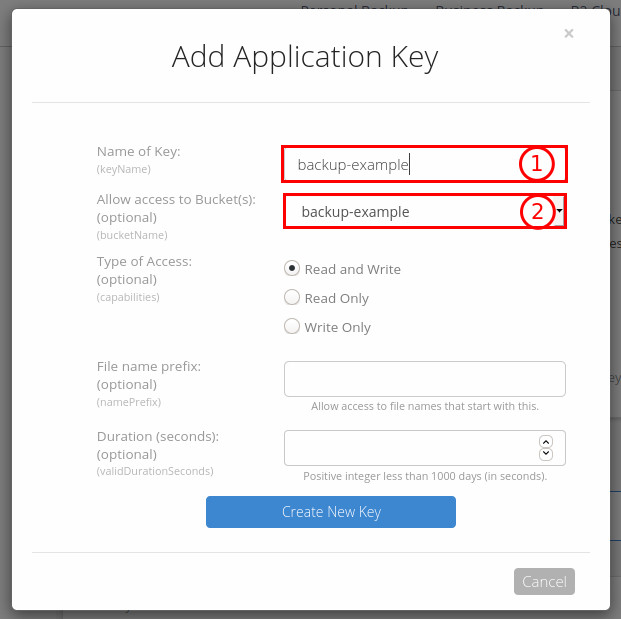
In the 1st field you enter the name of the key. To keep it simply, I use the same name as for bucket itself, but you can be creative here. On the 2nd field by default “All” is selected. Of course, you shouldn’t allow “machine A” to delete backups for “machine B”. Therefore I highly recommend allowing this access token only for one bucket. Now click on “Create New Key” and your access token will be generated.
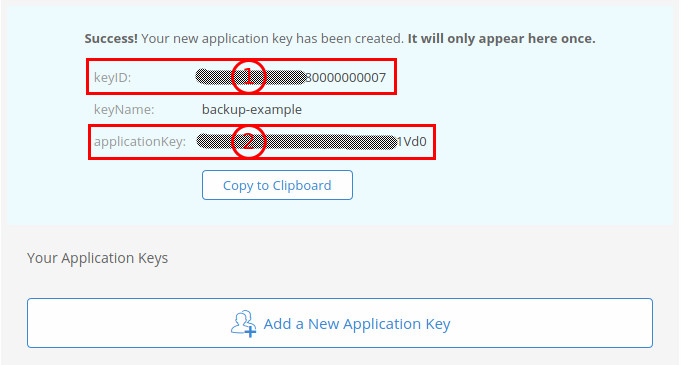
The provided keyID and applicationKey can be used to create the b2://-URL that is our future backup target. In order to do this, you put everything together following this schema: b2://<keyID>:<applicationKey>@<bucket name>. In this example it results in b2://XXXXXXXXXXXXXX80000000007:XXXXXXXXXXXXXXXXXXXXXXXXXXX1Vd0@backup-example.
Make sure to store this URL for later steps.
Duplicity on CentOS 7 with B2 backend
Duplicity is a wonderful tool for backups on Linux. Besides just being able to handle all kinds of storage backends from FTP, SMB, and S3 as well as SFTP or B2 storage, it is also integrated with GnuPG in order to encrypt all content of your backups. This is essential as you usually use an “untrusted” storage for off-site backups. While I’m reasonable sure that they take care about data center security and destruction of data and disks, I don’t want to risk anything and therefore encrypting data before sending it, makes things always safe.
Main problem is that in order to use the B2-backend, duplicity requires the python library b2sdk which is not packaged for CentOS 7. I try to avoid installing things using pip, as this either messes with your system installation or never looks spotless, instead I went for a solution that involves containers. As all hosts run moby-engine anyway, why not?
In order to do this, I started to build a container for duplicity. Taking a python base image, adding duplicity and the mentioned b2sdk dependency. Sending everything through CI, off to Quay and here we go.
docker run --security-opt "label:disable" --rm -v "$HOME/.cache/duplicity/:/archive" -v "/your/path/to/data:/backup/" quay.io/sheogorath/duplicity:0.8.12 /backup/ "b2://XXXXXXXXXXXXXX80000000007:XXXXXXXXXXXXXXXXXXXXXXXXXXX1Vd0@backup-example"
Bringing it to production with backup_lvm
In order to get the container running in production, I updated my existing backup solution.
The backup_lvm Ansible role which runs on a daily basis and before this change, was running duplicity directly installed on CentOS. With a few changes things are now running in a container and more confined than ever before.
All together the backup_lvm role works now like this:
- Create a directory for the backups
- Take a snapshot from all LVM volumes configured
- Mount those snapshots read-only in the directory that was created
- Take a backup of all volumes and push them, once encrypted, to Backblaze
- Unmount all snapshots
- Delete all snapshots
If you don’t want to use my Ansible role, you can still run the container with my settings in an own, minimal playbook:
# Ansible playbook to run a backup
---
- hosts: all
  vars:
    backup_target: "b2://XXXXXXXXXXXXXX80000000007:XXXXXXXXXXXXXXXXXXXXXXXXXXX1Vd0@backup-example"
    backup_path: "/path/to/backup" # The directory with the data you want to backup
    backup_gpg:
      id: "0x123456789" # long keyid, get it using `gpg --list-keys --keyid-format 0xlong`
      passphrase: "yoursecret" # passphrase for the generated GnuPG key
  tasks:
    - name: Run backup using duplicity container
      docker_container:
        name: duplicity-backup
        image: "quay.io/sheogorath/duplicity:latest"
        detach: false # Makes sure Ansible doesn't continue until the backup is finished or failed
        cleanup: true # Makes sure Ansible deletes the container after the backup is done
        memory: "512M" # 512MB of RAM are usually enough for duplicity
        memory_swap: "768M" # Of course, a little of swap always helps (this actually includes memory and swap)
        hostname: "{{ ansible_fqdn }}" # Using the FQDN here is important, because duplicity will otherwise complain about different hostnames for the backup
        volumes:
          - "{{ backup_path }}:/backup/:ro" # For a backup read-only data are needed
          - "/root/.cache/duplicity/:/archive" # This keeps the local repository for duplicity around. Otherwise duplicity will fetch it from the remote, which is not needed
          - "/root/.gnupg/:/root/.gnupg/" # This keeps the GnuPG key, and therefore is needed to encrypt the backups
        cap_drop:
          - all # Dropping all capabilities to only add the needed ones again
        capabilities:
          - "DAC_OVERRIDE" # Required to override ownership and permissions during backups
        security_opts:
          - "label:disable" # Disable SELinux confinement for the container, prevents the files from being labeled as container_file_t in order to be readable by duplicity
          - "no-new-privileges" # Prevents the container from regaining any dropped capabilities through SUID binaries
        command: "--full-if-older-than 1M --encrypt-sign-key \"{{ backup_gpg.id }}\" /backup/ \"{{ backup_target }}\""
        env:
          PASSPHRASE: "{{ backup_gpg.passphrase }}" # Providing the passphrase for the GnuPG key
        become: true # Running as root in order to talk to the docker daemon.
Just make sure to set the variables and you are ready to go!
In order to use GnuPG with duplicity, make sure you generate a key and save a copy of both, the private and the public key, in a secure place off your machine in order to allow recovery of your backup when the machine disappears one day.
Update 2020-04-16: If you run on CentOS or alike, you might need to run gpgconf --kill gpg-agent on the host after generating your key and before running the container in order to prevent the container failing due to connecting the local GPG agent, which has a too big version difference.
Conclusion
Backblaze appears to be a viable alternative to my existing backup storage and helps with keeping data available even when the worst case scenario appears and my entire account that hosts my infrastructure would disappear tomorrow.
With duplicity daily backups work out nicely and the containerized version makes it easy to evolve the setup even further. This tutorial should provide a rather detailed insight into how to decide on a good backup strategy, set up your backup storage and run your backups in an automated fashion. I wish, you always have, but never need a restorable backup!